Setting up
With many different adviser operating models out there, we've built our OSC to accommodate a multitude of different structures allowing you to work efficiently and effectively.
Extensive options to suit your business model
Depending on your business, and how you you would like your OSC experience to be structured, we have several different options for you. There are a few forms we need you to complete to get started, but we'll guide you through them.
Simply click on the title below that best describes your business and the structure you want, and we'll tell you what you need to do:
I have a small advisory business and operate out of a single office
The first thing you will need to do is set up a 'Master Account' structure for your advisory firm. After that you can start creating new users, if required, and give them certain rights and access to plan information.
- Step 1. Download, complete and sign the Master Account Holder Agreement. This details the Terms and Conditions of the service which your company must accept. It must be signed by someone who is authorised to do so on behalf of your company.
- Step 2. Download, complete and sign the OSC Account Creation and User Registration (Non-Networks) form. This is used to create your first Master User. This person effectively has administrative control and allows them to add, remove users etc. It must be signed by the person who will be the Master User and also by an Authorised Signatory for your company.
That's it. Unless you require further services such as online switching and dealing:
- Step 3. Download, complete and sign the Switching and Dealing User Rights Assignment form. This explains the additional Terms and Conditions of using the online switching and dealing service. It must be signed by the person who will be performing switches and deals, and it must also be signed by an Authorised Signatory for your company.
- Step 4. Having completed all of the above, your company must be the appointed Investment Adviser to a specific plan. If this isn't the case, you and your client will need to sign an Investment Adviser Appointment form (Regular Payment / Lump sum payment versions). Once everything has been put in place, online switching and dealing will then be available to use.
I have an advisory business with multiple departments and plan responsibilities
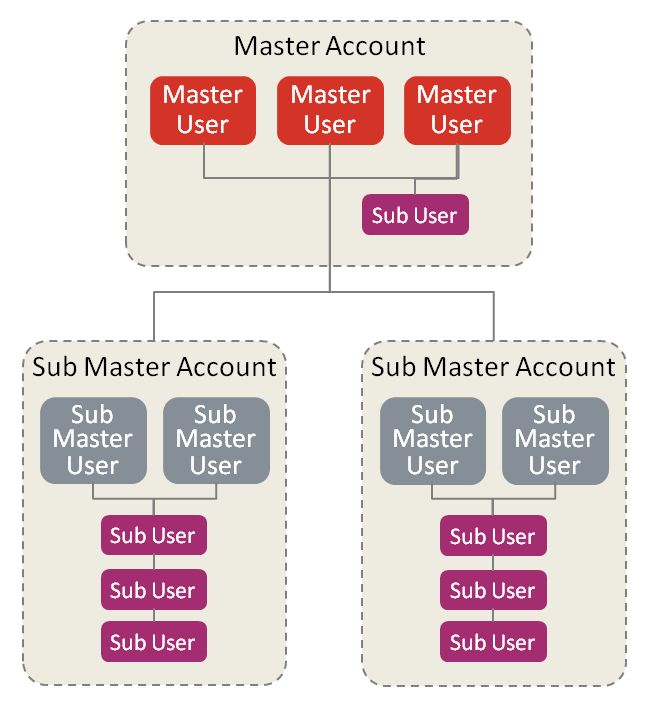
The first thing you will need to do is set up a 'Master Account' structure for your advisory firm. After that you can start creating sub-master accounts and new users, if required, and give them certain rights and access to plan information.
- Step 1. Download, and read Setting up a Master Account for larger firms with multiple departments.
- Step 2. Download, complete and sign the Master Account Holder Agreement. This details the Terms and Conditions of the service which your company must accept. It must be signed by someone who is authorised to do so on behalf of your company.
- Step 3. Download, complete and sign the OSC Account Creation and User Registration (Non-Networks) form. This is used to create your first Master User. This person effectively has administrative control and allows them to add, remove users etc. It must be signed by the person who will be the Master User and also by an Authorised Signatory for your company.
- Step 4. Continue to page 3 of the OSC Account Creation and User Registration (Non-Networks) form. This is used to create your Sub-Master Accounts. You can have multiple Sub-Master Accounts. Master Accounts can see all policies in each of the Sub-Master Accounts below them, but each Sub-Master Account can only see the plans that have been allocated to them.
That's it. Unless you require further services such as online switching and dealing:
- Step 5. Download, complete and sign the Switching and Dealing User Rights Assignment form. This explains the additional Terms and Conditions of using the online switching and dealing service. It must be signed by the person who will be performing switches and deals, and it must also be signed by an Authorised Signatory for your company.
- Step 6. Having completed all of the above, your company must be the appointed Investment Adviser to a specific plan. If this isn't the case, you and your client will need to sign an Investment Adviser Appointment form (Regular Payment / Lump Sum Payment versions). Once everything has been put in place, online switching and dealing will then be available to use.
Illustration of Master with Sub-Master Account structure - please click on the image to enlarge

I have a large advisory business with offices in multiple regions
The first thing you will need to do is set up a 'Master Account' structure for your advisory firm. After that you can start creating sub-master accounts and new users, if required, and give them certain rights and access to plan information.
- Step 1. Download, and read Setting up a Master Account for larger firms with multiple office locations.
- Step 2. Download, complete and sign the Master Account Holder Agreement. This details the Terms and Conditions of the service which your company must accept. It must be signed by someone who is authorised to do so on behalf of your company.
- Step 3. Download, complete and sign the OSC Account Creation and User Registration (Non-Networks) form. This is used to create your first Master User. This person effectively has administrative control and allows them to add, remove users etc. It must be signed by the person who will be the Master User and also by an Authorised Signatory for your company.
- Step 4. Continue to page 3 of the OSC Account Creation and User Registration (Non-Networks) form. This is used to create your Sub-Master Accounts for various regional offices. You can have multiple Sub-Master Accounts. Master Accounts can see all plans in each of the Sub-Master Accounts below them, but each Sub-Master Account can only see the plans that have been allocated to them.
That's it. Unless you require further services such as online switching and dealing:
- Step 5. Download, complete and sign the Switching and Dealing User Rights Assignment form. This explains the additional Terms and Conditions of using the online switching and dealing service. It must be signed by the person who will be performing switches and deals, and it must also be signed by an Authorised Signatory for your company.
- Step 6. Having completed all of the above, your company must be the appointed Investment Adviser to a specific policy. If this isn't the case, you and your client will need to sign an Investment Adviser Appointment form (Regular Payments / Lump Sum Payment versions). Once everything has been put in place, online switching and dealing will then be available to use.
Illustration of Master with Sub-Master Account structure - please click on the image to enlarge

I am the head of a network of advisers, and have a centralised administration team
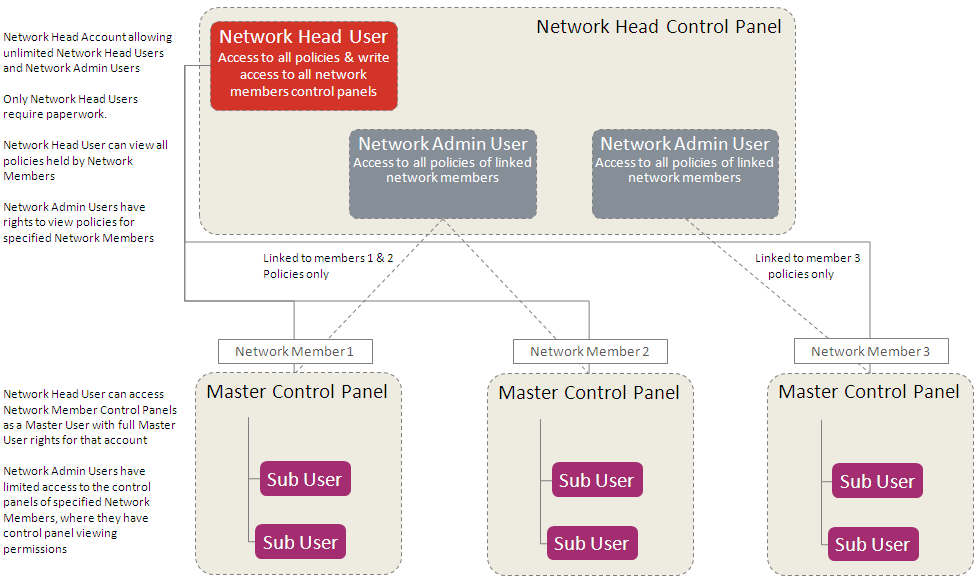
The first thing you will need to do is set up a 'Master Account for Networks' structure for your firm. You can then have multiple 'Network Members' which your administrators can control collectively or individually where required.
- Step 1. Download, complete and sign the Master Account Holder Agreement. This details the Terms and Conditions of the service which your company must accept. It must be signed by someone who is authorised to do so on behalf of your company.
- Step 2. Download, complete and sign the OSC Account Creation and User Registration (Networks) form. This is used to create your first Network Head Master User. This person can have administrative control over Network Members and allows them to add, remove users etc. It must be signed by the person who will be the Network Head Master User and also by an Authorised Signatory for your company.
- Step 3. Network Members will automatically appear as separate Master Accounts within your structure. You can then assign Network Admin Users to look after these and set up new users within them.
That's it, except where you require additional Master Users within your Network Members or you require further services such as online switching and dealing, in which case:
- Step 4. Please speak to our Web Support team who will be able to guide you through the best way to set up your structure.
Illustration of a Network Head structure - please click on the image to enlarge
